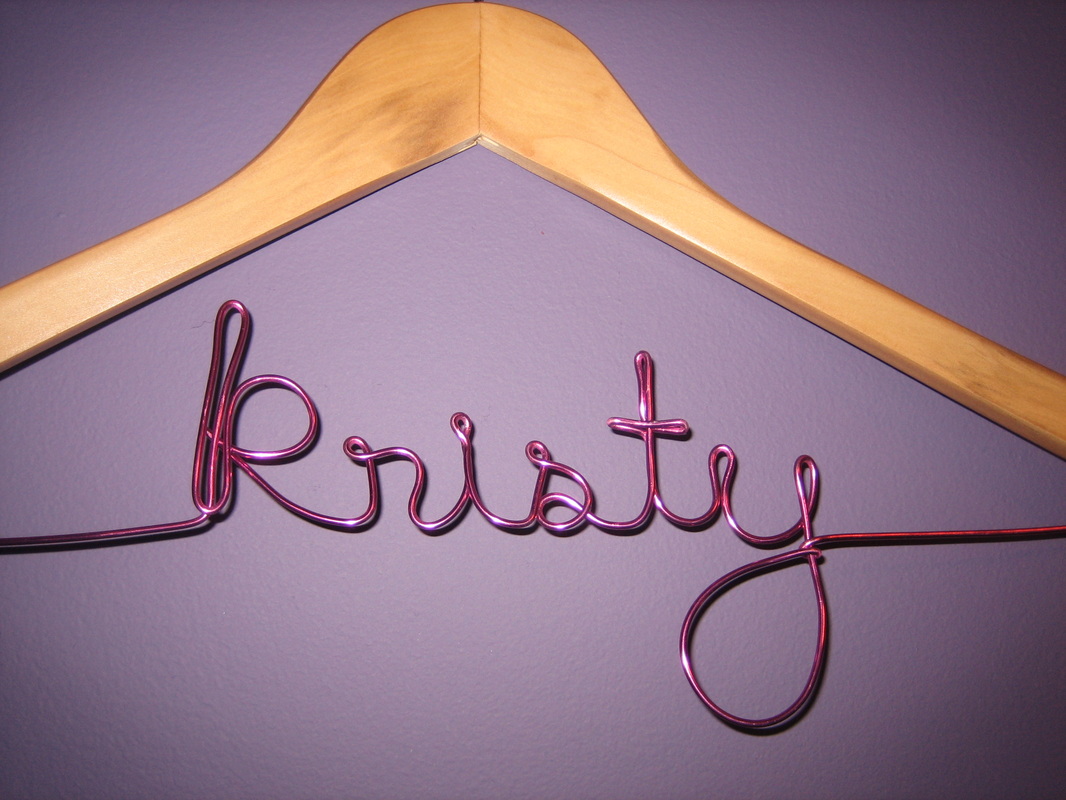
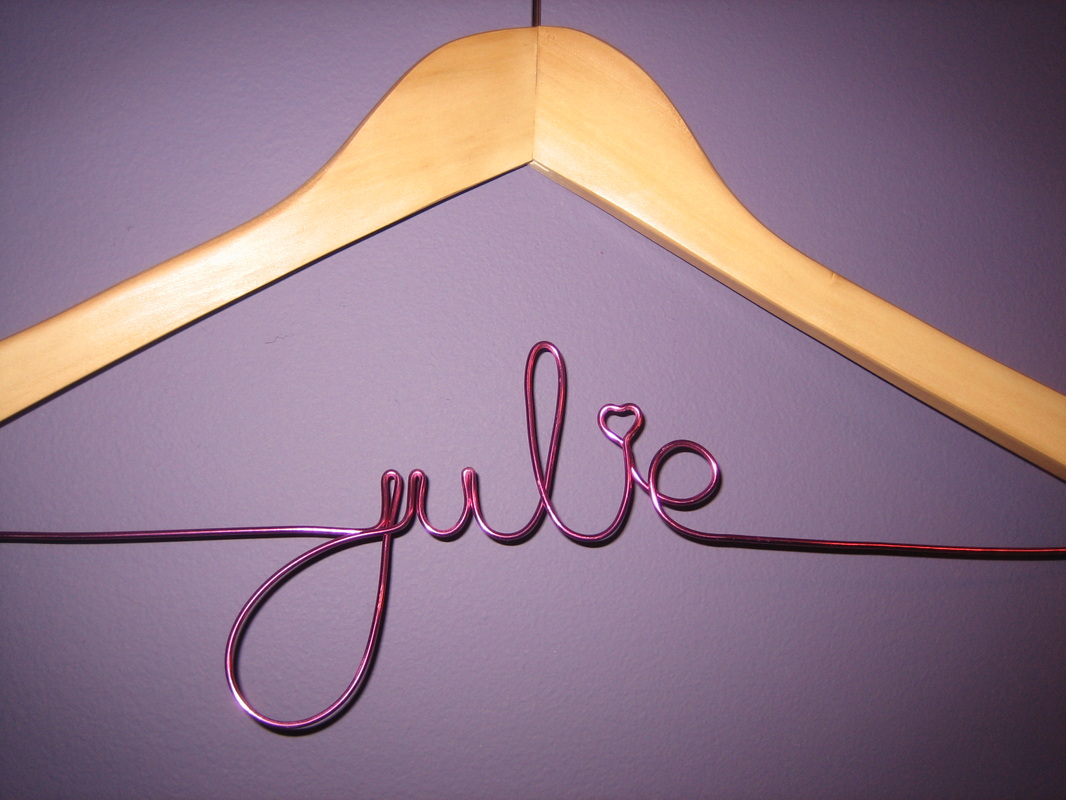
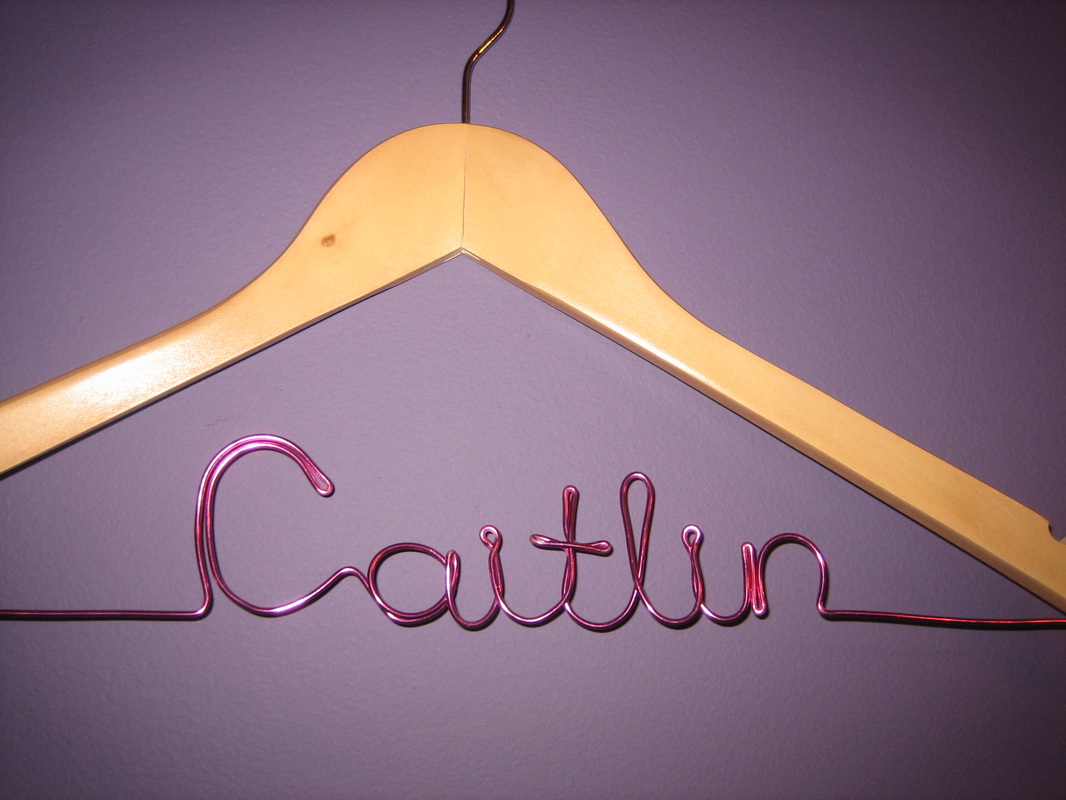
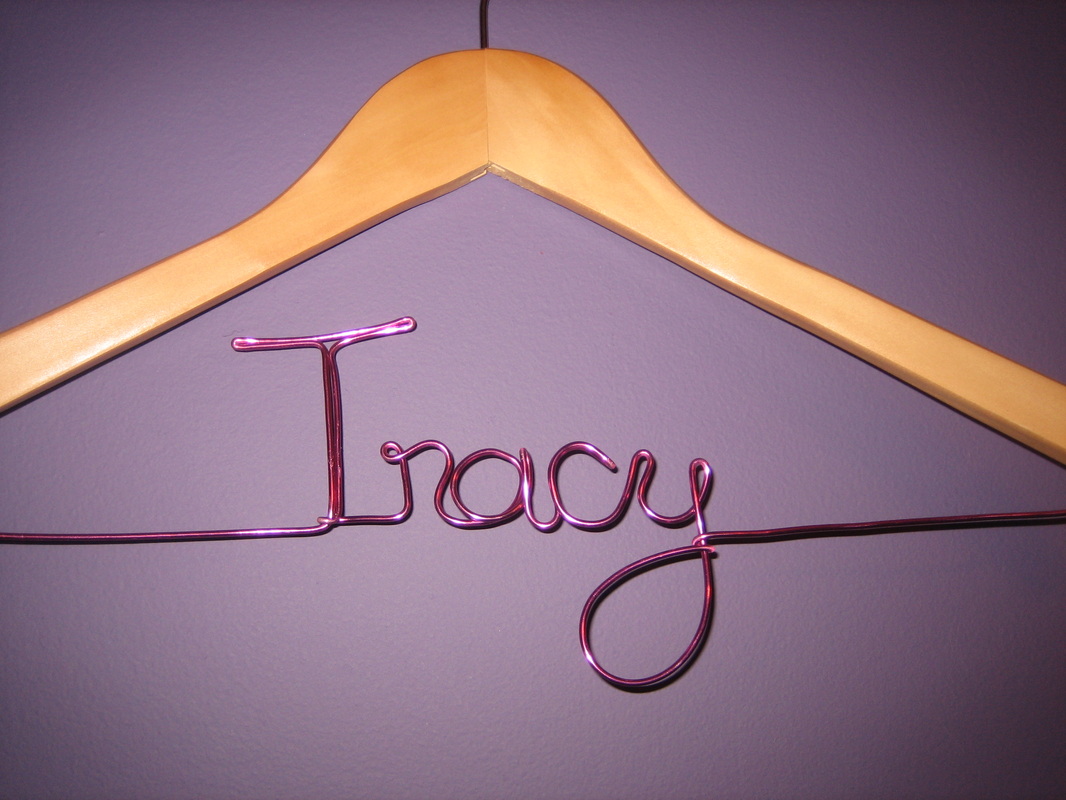
Bridesmaid Hangers
So the “Thanks” here goes out to Knottie Shellbell026 (who’s hanger tutorial can be found here) and to my fiance who actually made all of these because I stink at bending wire and drilling holes. What we found really helpful was googleing stuff like ‘custom wire hanger‘ as well as looking on Etsy to see how others formed the letters. Once he had a visual, fiance found it pretty easy to shape the wire. The Jo-Ann Fabrics by me only went down to 14 gauge wire and we wanted something sturdier so we got the hot pink 12 gauge wire on eBay. I believe you can get colored wire from the jewelry section of most craft stores.

Bride & Groom Chair Signs
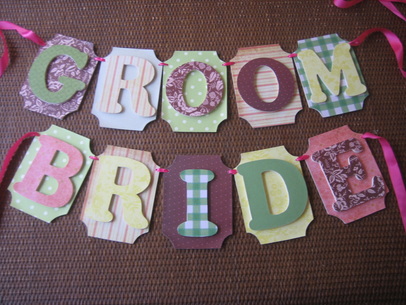
This is a very easy project to do since the wood pieces come pre-cut.
Materials:
10 pre-cut wooden plaques (a few cents each)
Pre-cut wooden letters (a few cents each)
They also had a variety of different style letters to choose from
Scrapbook paper
Glue
Ribbon
Drill
I was able to purchase the materials from Jo-Ann Fabrics and my fiance did the drilling for me.
Instructions:
Choose the scrapbook paper you want to use. Trace each letter onto the paper and cut it out. You'll want to trace the letters backwards and on the reverse side of the paper you'll be using.
Attach the scrapbook paper to the letters and backgrounds with glue. Put weights (we used books) on top of them and let them dry over night.
Drill the holes for the ribbon into the background pieces.
Before I attached the letters to the backgrounds, I put two coats of Elmers glue on top, just to make them a little sturdier and somewhat water-proof.
Glue the letters onto the backgrounds.
Let them sit over night with more weight on top.
Thread the ribbon through the holes, leaving plenty extra on the ends to be able to attach them to your reception chairs.
Bridal Suite Door Hanger
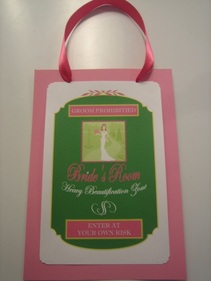
I designed this in Microsoft Publisher. It says:
Groom Prohibited
Bride's Room
Heavy Beautification Zone
Enter At Your Own Risk
I added a rhinestone to jazz it up a bit. This was a very simple project and I'm happy with how it came out.
The inspiration for this comes from Tie That Binds, but it seems like they no longer offer this design on their site.
Pinwheels
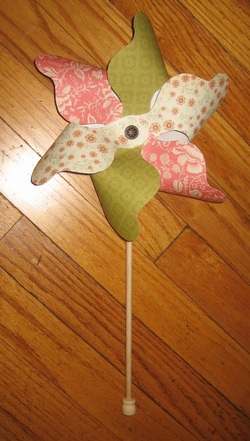
Whimsy is a word that Jeff and I have been throwing around in regards to our wedding. In our look, attitude and decor, whimsical is a theme that is classic, elegant, fun and perfect for an afternoon summer wedding.
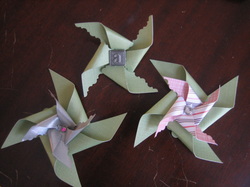
I've loved the idea of pinwheels since I saw them used as bridesmaid bouquets while digging through Etsy (Rule42 is the Etsy seller where most of my inspiration is coming from).
The pinwheel shown here is the one I made as a prop for our engagement shoot. After our engagement shoot I added some hot pink ribbon tied on to the top and flowing all the way down the handle. This will be carried by our flower girl during the ceremony.
Materials:
Paper (preferably double-sided scrapbook paper)
Dowels (I used 1/4 inch round x 12 inches long and found them in packs of 10 for $2.49 at Michaels)
Dowel Caps (Make sure you get ones with a hole the same size as your dowels -- I found packs of 7 at Michaels for $1.49)
Grommets and Grommet Tool (you'll need a hammer as well)
Button, Rhinestone, whatever (to decorate over the screw)
A Screw (flat head that will not fall through your grommets)
Drill and Drill Bit that corresponds to the size screw you have
Scissors
Glue
Instructions:
The primary instructions I used can be found at Style Me Pretty.
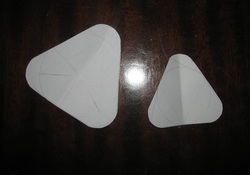
The template I used for the shape of the blades can be found here.
Follow Style My Pretty's instructions for putting together the blades of the actual pinwheel.
Here is how my instructions differ from the ones on Style Me Pretty.
I attached a dowel cap to each side of my dowel to make it look nicer. You can add a drop of glue, but mine fit quite snug and that didn't seem necessary. Figure out which end you want to attach the pinwheel to. Using your drill bit that corresponds to the size screw you have, carefully drill into the dowel cap (how far you go will depend on how long the screw you got is -- use your judgement). Next connect the pinwheel to the dowel by putting the screw through the pinwheel grommets and screw it into the dowel cap where you drilled the hole. To make it look nicer, you can take a dab of glue and put a decorative piece over the screw top. Let it sit and dry.
Voila! You have a beautiful pinwheel.
I've loved the idea of pinwheels since I saw them used as bridesmaid bouquets while digging through Etsy (Rule42 is the Etsy seller where most of my inspiration is coming from).
The pinwheel shown here is the one I made as a prop for our engagement shoot. After our engagement shoot I added some hot pink ribbon tied on to the top and flowing all the way down the handle. This will be carried by our flower girl during the ceremony.
Materials:
Paper (preferably double-sided scrapbook paper)
Dowels (I used 1/4 inch round x 12 inches long and found them in packs of 10 for $2.49 at Michaels)
Dowel Caps (Make sure you get ones with a hole the same size as your dowels -- I found packs of 7 at Michaels for $1.49)
Grommets and Grommet Tool (you'll need a hammer as well)
Button, Rhinestone, whatever (to decorate over the screw)
A Screw (flat head that will not fall through your grommets)
Drill and Drill Bit that corresponds to the size screw you have
Scissors
Glue
Instructions:
The primary instructions I used can be found at Style Me Pretty.
The template I used for the shape of the blades can be found here.
Follow Style My Pretty's instructions for putting together the blades of the actual pinwheel.
Here is how my instructions differ from the ones on Style Me Pretty.
I attached a dowel cap to each side of my dowel to make it look nicer. You can add a drop of glue, but mine fit quite snug and that didn't seem necessary. Figure out which end you want to attach the pinwheel to. Using your drill bit that corresponds to the size screw you have, carefully drill into the dowel cap (how far you go will depend on how long the screw you got is -- use your judgement). Next connect the pinwheel to the dowel by putting the screw through the pinwheel grommets and screw it into the dowel cap where you drilled the hole. To make it look nicer, you can take a dab of glue and put a decorative piece over the screw top. Let it sit and dry.
Voila! You have a beautiful pinwheel.
Parent Photo Charms for Brooch Bouquet
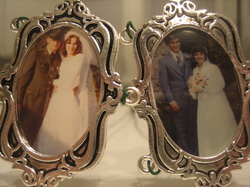
I purchased the photo charm frames from Jo-Ann Fabrics. I then printed out small images of both of our parent's wedding photos and added them to the frame. We then wired up the photo charms to be added to the brooch bouquet.
Brooch Bouquet Instructions
Brooch Bouquet Instructions
Garter
I had been going back and forth about DIYing my garter. I found plenty on Etsy that I loved, but really couldn't justify spending the amount sellers were asking. Walking through Michaels, I was scoping out some of their ribbons and just happened to come across a hot pink one I though would work perfectly for a garter since it had little frills on either side. So at that moment I figured, what the heck, why not? and decided to go for it.
For the most part, I followed these instructions: How to Make a Beautiful Bridal Garter
I didn't make one quite as intricate as the one in the link though. The primary difference is that the garter in the instructions has a fabric backing on it, so she doubled up on the main ribbon. What I did was take my 1.5" ribbon and sewed my 5/8" ribbon onto the middle. I was careful to sew right along the very edges of the accent ribbon so that 1/2" elastic could be pulled through later. Once the ribbons were sewed together, I pulled through the elastic and sewed together the two ends. The back certainly isn't as neat as the one in the instructions, but I figured it will be hidden against my leg anyway and this is not a toss garter.
I will also be adding some sort of decoration to go over the seam.

I also stitched a little something blue inside of my garter.
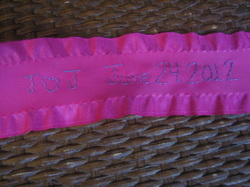
J (heart) J JUNE 24, 2012
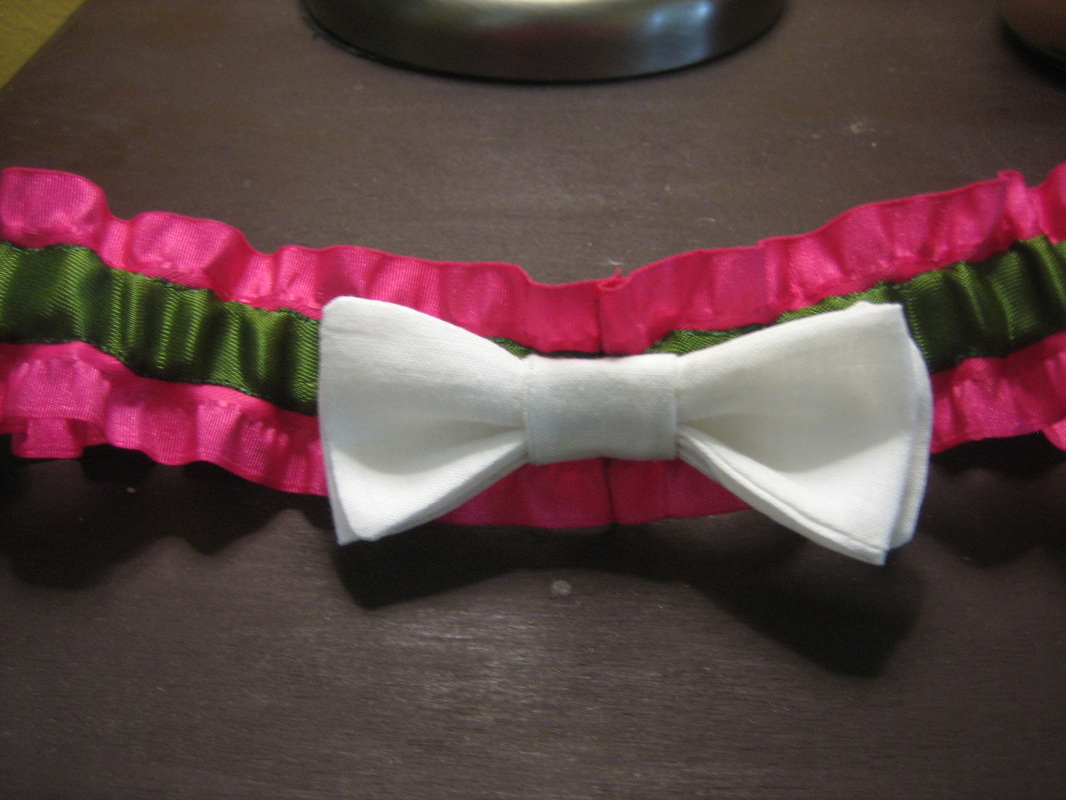
Garter Embellishment
So I ended up having Jeff make a bow tie to cover the seam in my garter. I thought it was a great idea since the guys will all be wearing bow ties and Jeff loves a good bow tie. Originally I saw the idea on Etsy.
My finished garter
|
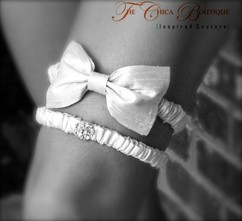
Inspiration from Etsy seller The Chica Boutique
|
Original Garter Embellishment Idea
Now for something pretty to cover up the seam of my garter. I searched a bunch of craft stores and couldn't find anything that I liked to embellish my garter. I was even open to flowers, fancy buttons, whatever. Most of the fabric flower tutorials seemed a bit too complicated for my beginner sewing abilities. Then I stumbled across this lovely tutorial at Ruffles and Stuff for a no-sew fabric flower. YAY! Just what I was looking for.
Jeff came up with the absolutely amazing idea to use rounded corner triangles rather then circles for the petals. This gave the flower petals a more scattered look. Below are the patterns we used to cut the fabric. The larger one was used for the four petals on the bottom and the smaller one was used for the three petals on the top.
Jeff came up with the absolutely amazing idea to use rounded corner triangles rather then circles for the petals. This gave the flower petals a more scattered look. Below are the patterns we used to cut the fabric. The larger one was used for the four petals on the bottom and the smaller one was used for the three petals on the top.
Glue them all together, add a little rhinestone to the middle and there you have it, a lovely fabric flower to go with my vibrant pink and green garter. All I need now is a pin pack to glue to the flower and pin to the garter and then this project will be officially complete.

Flip-Flop Size Tags
This was one of those super easy projects that I hope will make a nice impact for my guests. I plan to tie together the flip-flops (sole to sole) with a nice ribbon. I wanted to put tags on each pair of flip-flops so my guests will know which sizes are available.
I set these up in Microsoft Publisher, printed them on white cardstock and used a decorative punch that I already own to cut them out.
I set these up in Microsoft Publisher, printed them on white cardstock and used a decorative punch that I already own to cut them out.

Boutonnieres
There will be 2 groomsmen and a best man. Each will have a double pinwheel boutonniere. The smaller inside pinwheel will be different for each guy.
The larger pinwheel is 3 inches and the smaller pinwheel is 2 inches. They are held together with a gem brad and they have pin backs hot glued to them.
The small pinwheel with the 'a' in the center is for our ring bearer. His first initial is 'a'.
The larger pinwheel is 3 inches and the smaller pinwheel is 2 inches. They are held together with a gem brad and they have pin backs hot glued to them.
The small pinwheel with the 'a' in the center is for our ring bearer. His first initial is 'a'.
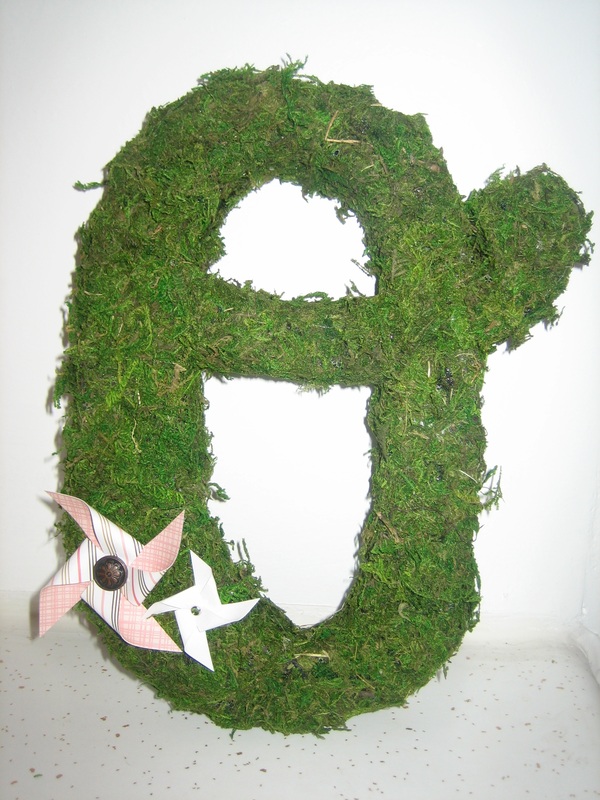
Moss Letter '0'
For my moss letter I followed the instructions of fellow knottie CvilleClaire and they can be found on her blog Small and Chic in Cville.
With my future last initial being 'O', I wasn't sure I even wanted to attempt this project. If 1 is the loneliest number, 'O' is certainly the loneliest letter (ie: zero, and it's just overall a boring, too symmetrical letter). I definitely wanted to use an 'O' that had a little flair to it.
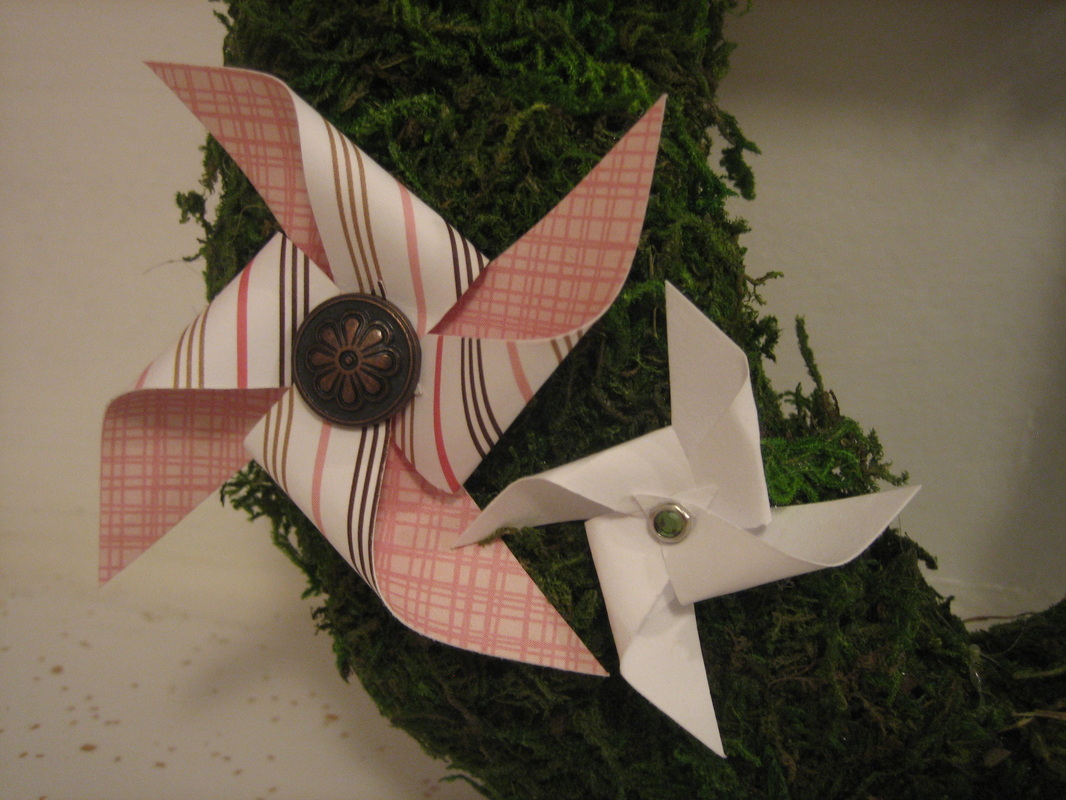
I also went ahead and added a few pinwheels to brighten it up a bit and to tie it in to the rest of our reception decor. The moss letter will be displayed on our card and guest book table.
Some things to consider with this project:
1. This took me the better part of an entire day. Although a fairly intricate letter, it's not as large as many of the other moss letters I've come across. I only used a standard size sheet of cardstock to print out the template and my final letter is about 10" tall.
2. Be prepared to use a lot of hot glue sticks. I have a mini hot glue gun and went through countless sticks for this project, so make sure you have a ton of them on hand.
3. Be careful! I got my first serious hot glue burn working on this project. I'm amazed I can even type this right now.
4. Moss mat stinks! Seriously, I was not prepared for the odor that emerged from that bag. When my fiance came home, he was sniffing around for "that smell" and I had to inform him that it was indeed the moss.
With my future last initial being 'O', I wasn't sure I even wanted to attempt this project. If 1 is the loneliest number, 'O' is certainly the loneliest letter (ie: zero, and it's just overall a boring, too symmetrical letter). I definitely wanted to use an 'O' that had a little flair to it.
I also went ahead and added a few pinwheels to brighten it up a bit and to tie it in to the rest of our reception decor. The moss letter will be displayed on our card and guest book table.
Some things to consider with this project:
1. This took me the better part of an entire day. Although a fairly intricate letter, it's not as large as many of the other moss letters I've come across. I only used a standard size sheet of cardstock to print out the template and my final letter is about 10" tall.
2. Be prepared to use a lot of hot glue sticks. I have a mini hot glue gun and went through countless sticks for this project, so make sure you have a ton of them on hand.
3. Be careful! I got my first serious hot glue burn working on this project. I'm amazed I can even type this right now.
4. Moss mat stinks! Seriously, I was not prepared for the odor that emerged from that bag. When my fiance came home, he was sniffing around for "that smell" and I had to inform him that it was indeed the moss.

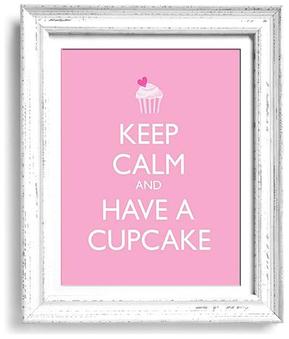
Cake (Cupcake) Table Sign
I really don't care if these signs are all over the place these days. I fell in love with the cupcake "Keep Calm" sign the moment I saw it. There are dozens of places that you can purchase these signs from, but I figured I would tackle this one on my own.
Inspiration
|
My Design
 |
Framed
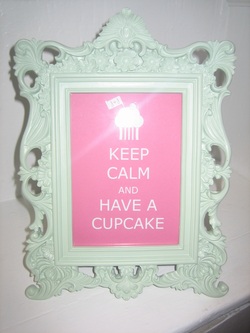 This frame holds a 5x7 picture. Sorry about the glare.
|
I found my frame at Marshalls and did splurge on it a bit, making this project a little more expensive than I was hoping. The frame does have the teeniest little crack in the side so they knocked off 10%. Total, this project was still under $10 and I'm really happy I did this one on my own.
As a bonus, I think it's the perfect frame for a babies room in the future :)
I did re-print this in the end to fix the extra spacing on the bottom. So above is really take 1, but take 2 isn't much different -- I just scooted everything down about a half inch.
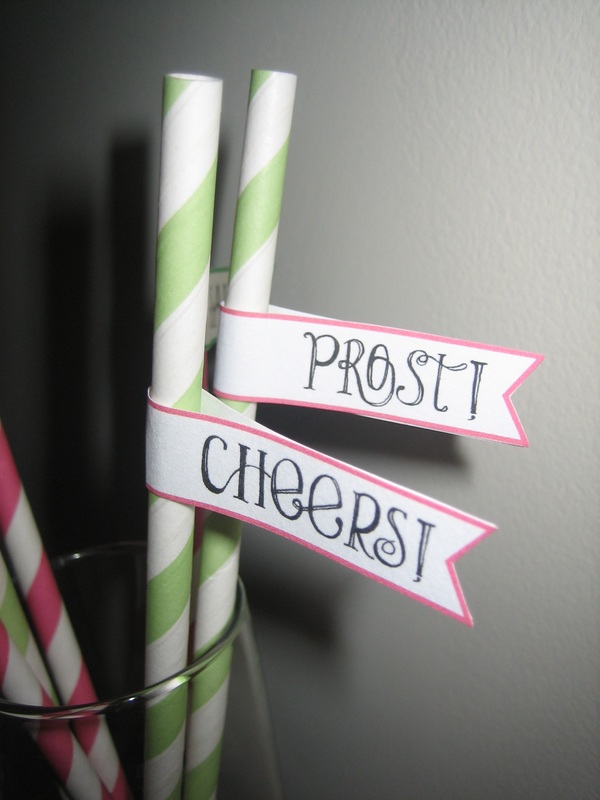
Drinking Straws with Flags
I got these awesomely sweet retro drinking straws from The Sugar Diva. There were a bit pricey (around $12 with the shipping), but it's one of those fun little details that I hope will add to our reception. I received 25 in hot pink and 25 in green and plan to set these up at our margarita bar :)
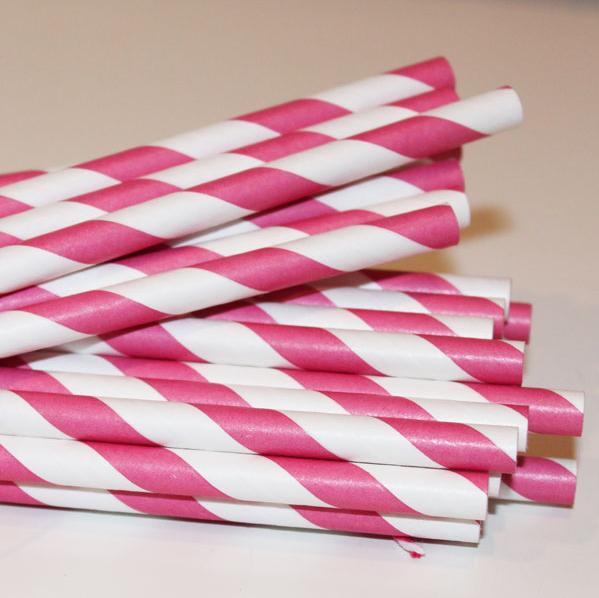
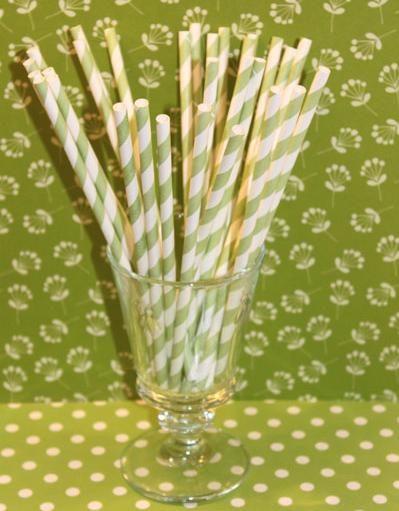
I designed the flags in Microsoft Publisher using the same font that is found on my 'Save the Dates' and printed them out on regular white cardstock.
First, I used petit Zots to attach the flags to the straws. I began by using just two Zots on each, but felt that three worked better in the end. One Zot was put right in the middle of the flag to stick the flag to the straw and the other two were used to hold together the two ends of the flags. In the end, the Zots didn't work! All of my flags were falling down. So take two, I printed all of them out again on sticker paper. MUCH better idea! Now there is no chance they will come off and they still look great.
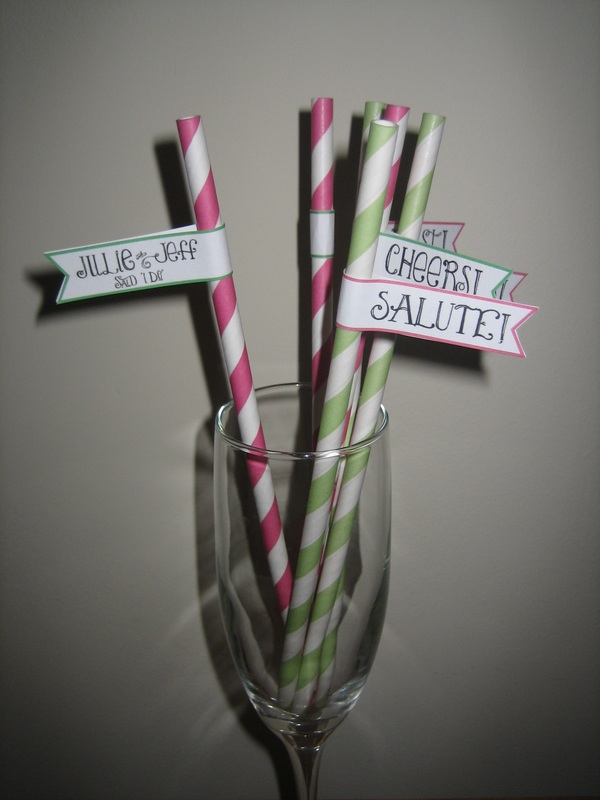
Each straw says on one side "Julie and Jeff said I Do"
On the other side each one says either Cheers!, Prost! or Salute!
On the other side each one says either Cheers!, Prost! or Salute!
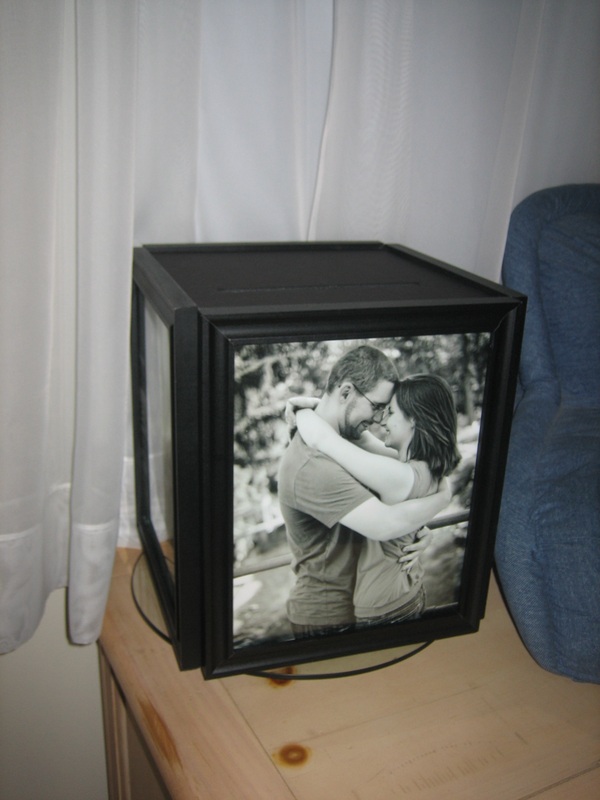
Photo Frame Card Box
FI finally was able to put this together and I think it came out great! I'm still going to add "Cards" using some wood letters to the top, but otherwise it's all done. The frames were purchased at Walmart for $4 each, the 8x10 prints of our engagement photos were done at CVS using the 1 hour service (which saved us about $9 and we still were able to get them immediately), and the lazy susan we had lying around our house and will be able to reclaim it after the wedding. My original inspiration for this came from the Road to the Aisle blog.
|

|
Ring Bearer "Pillow"
FI is a big VW fan. He restored one a few summers ago and it's basically his baby. I thought it would be really nice to incorporate his love of VW's into our ceremony. My inspiration came from this image on Etsy:
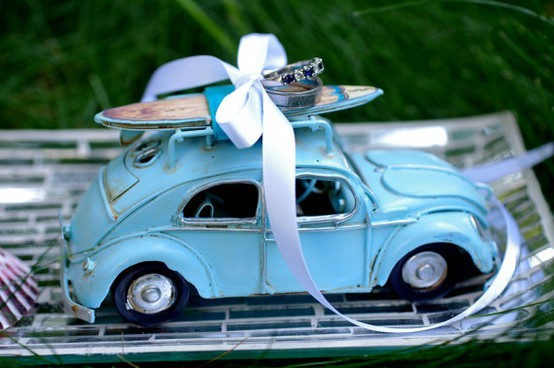
(From Etsy seller Beautiful Details by the Seashore)
I purchased a black VW Beetle at 1:18 from Amazon and plan to tie hot pink and green ribbon through the doors that will hold our rings on top. I really love this idea and think it's very unique and suites fiances personality well. I hope our ring bearer will enjoy getting to carry a toy car down the aisle rather than a pillow.

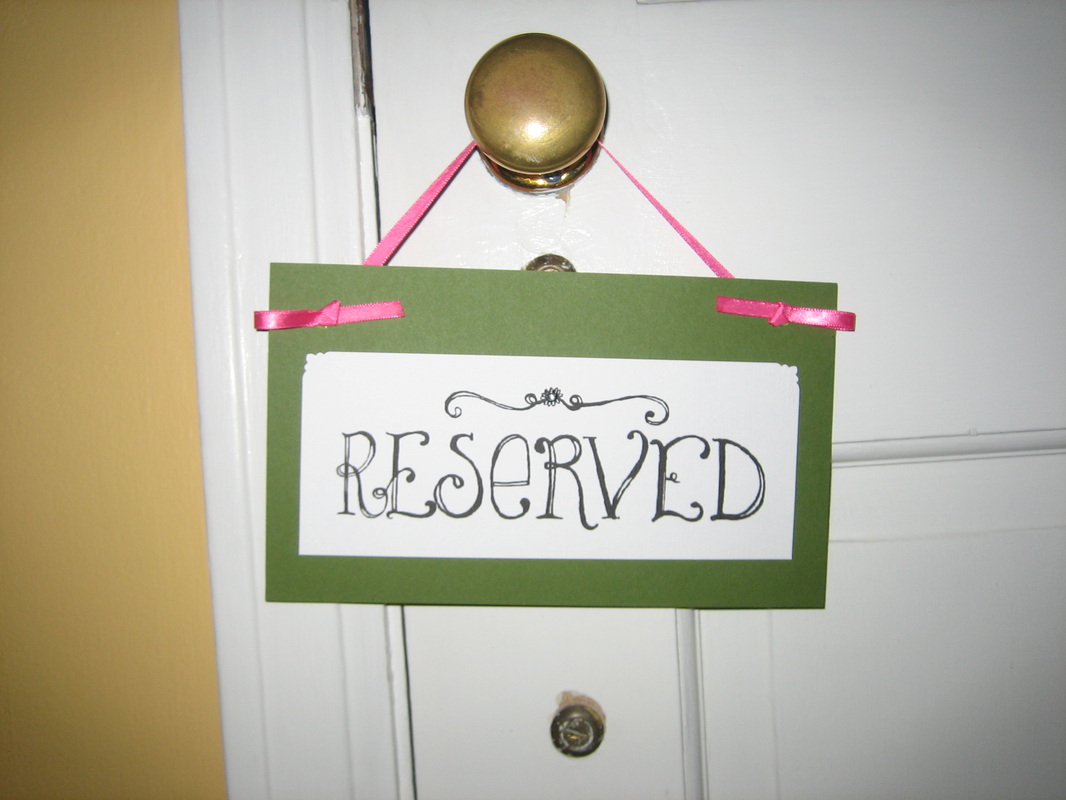
Reserved Seating Signs
An easy weekend morning project. We decided to only do the front row as reserved seating for our parents and grandparents, so I ended up making two of these signs, one for the right and one for the left.
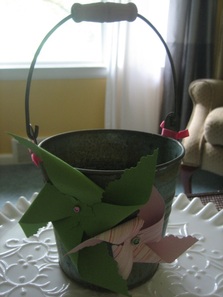
Flower Girl Bucket
I was originally going to send my 3 year-old flower girl down the aisle carrying the large pinwheel (see above). Then everyone started talking about how she would throw the flower petals so well. I couldn't deny her that opportunity. So the search began for a basket that I could dress up and put the petals in. I found a galvanized bucket at Jo-Ann Fabrics that was on sale for $3.99! Add some pinwheels and a little ribbon (made from materials already on hand) and you have an adorable flower girl prop that ties in perfectly to our garden party theme.
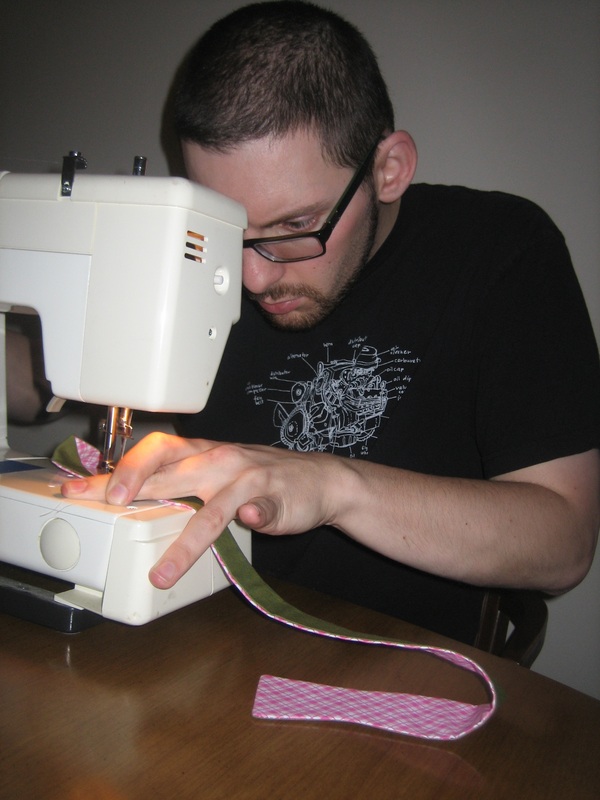
Bow Ties!
Words can simply not explain how amazing my fiance truly is. From the day we were engaged he talked about how he wanted to make the bow ties that he and his groomsmen would wear for the big day. Two years went by with nothing happening. Sure he's on the look-out for cool fabric, but always coming up empty handed. Well, we took a last ditch trip to several fabric shops in the area and ended up back at Joann Fabrics for the millionth time. But now they finally had their summer fabrics out and we were able to score some awesome hot pink checkered fabric. We got home and Jeff finally got to work on cranking out some pretty sweet bow ties.
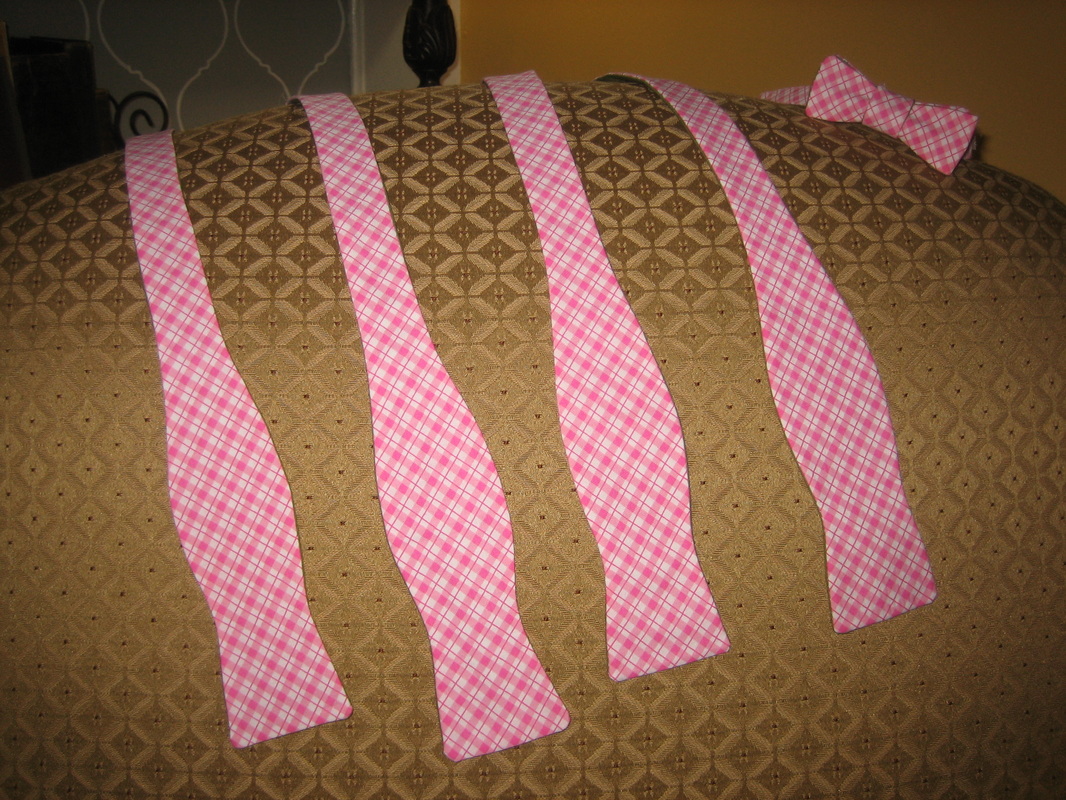
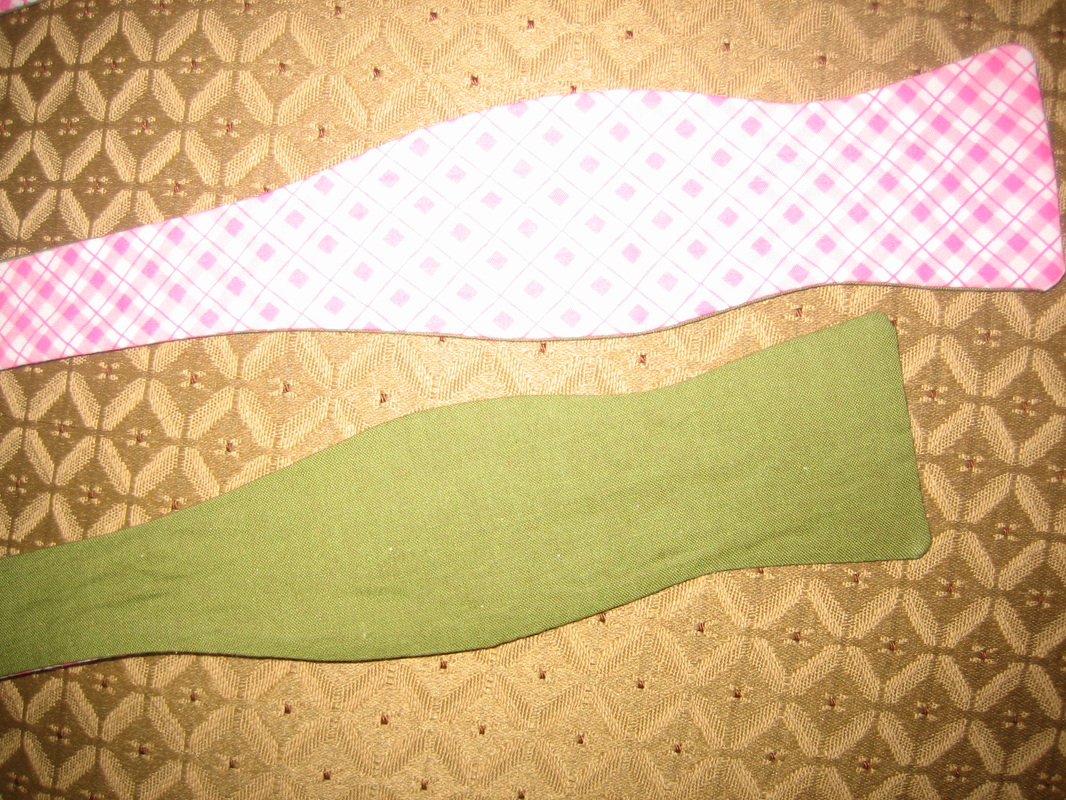
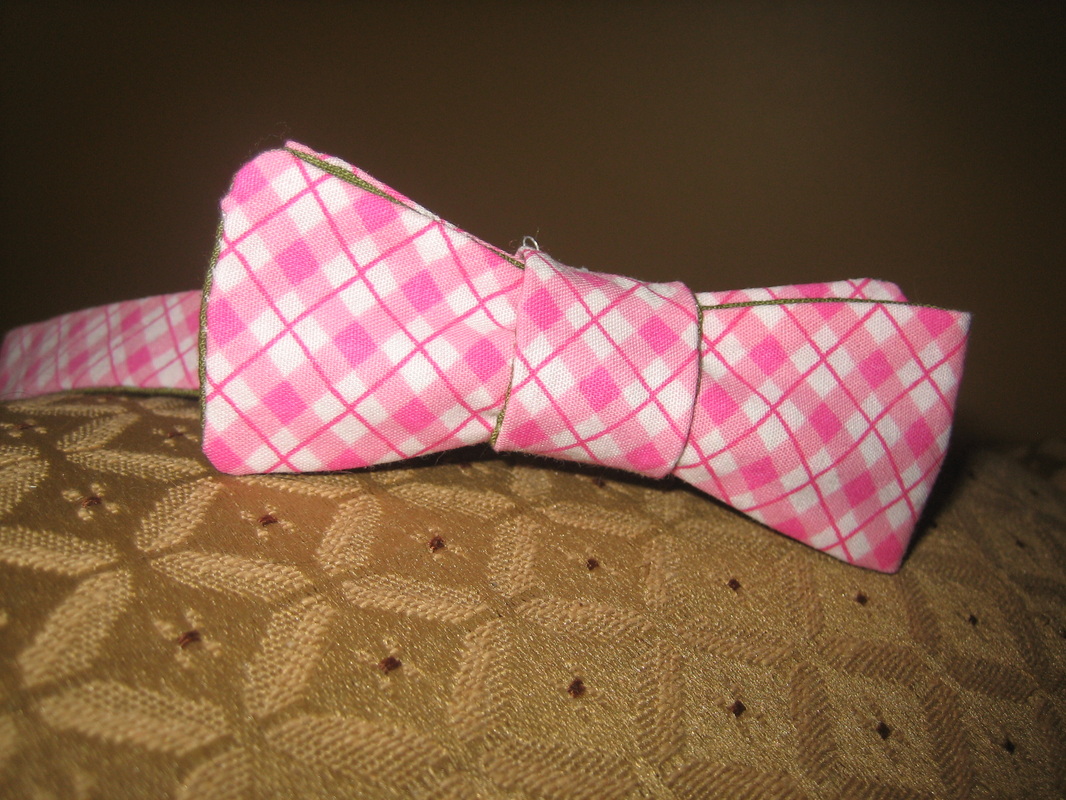
The first pictures shows them all lined up. The second shows the front and back. They guys will wear the bow ties with the pink facing out and the green in the back. The third picture is the pre-tied, velcro bow tie for our ring bearer (if he wants it).
And the proof that Jeff really did make all of these:
And the proof that Jeff really did make all of these:

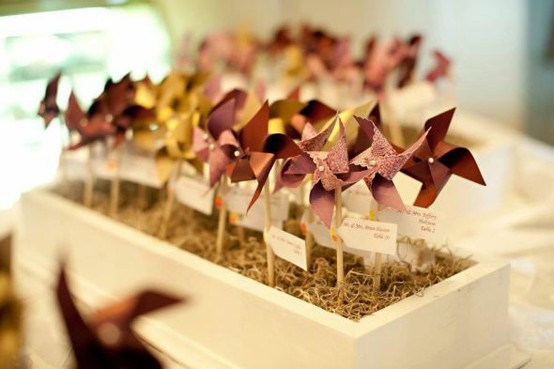
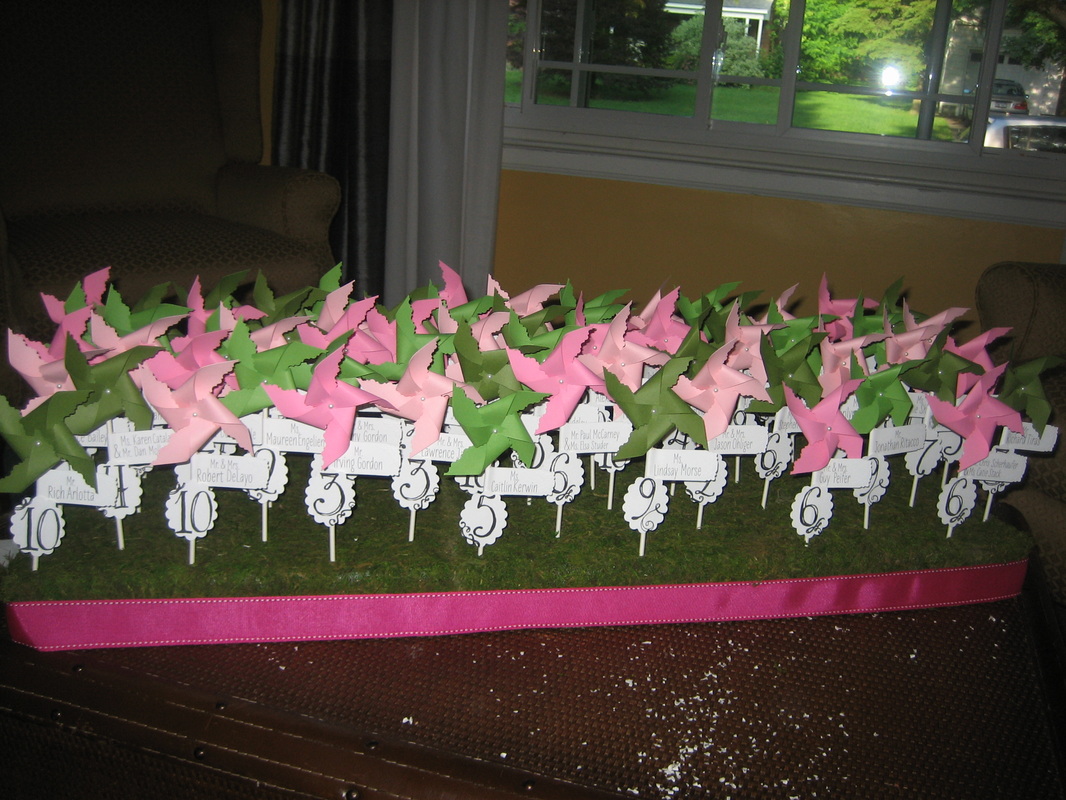
Escort Card Display
The inspiration (left image) for my pinwheel escort card display I found on Pinterest (originally pinned from Wedding Bee). I thought it was cute and different. I made one base to hold all of the pinwheels. They are pretty tight together and some may be difficult to read, but oh well. They are in alphabetical order so we're hoping people can figure it out. Once some start to go and it thins out, they will be easier to read. In the end, this project took A LOT of time, but I think it was worth it.
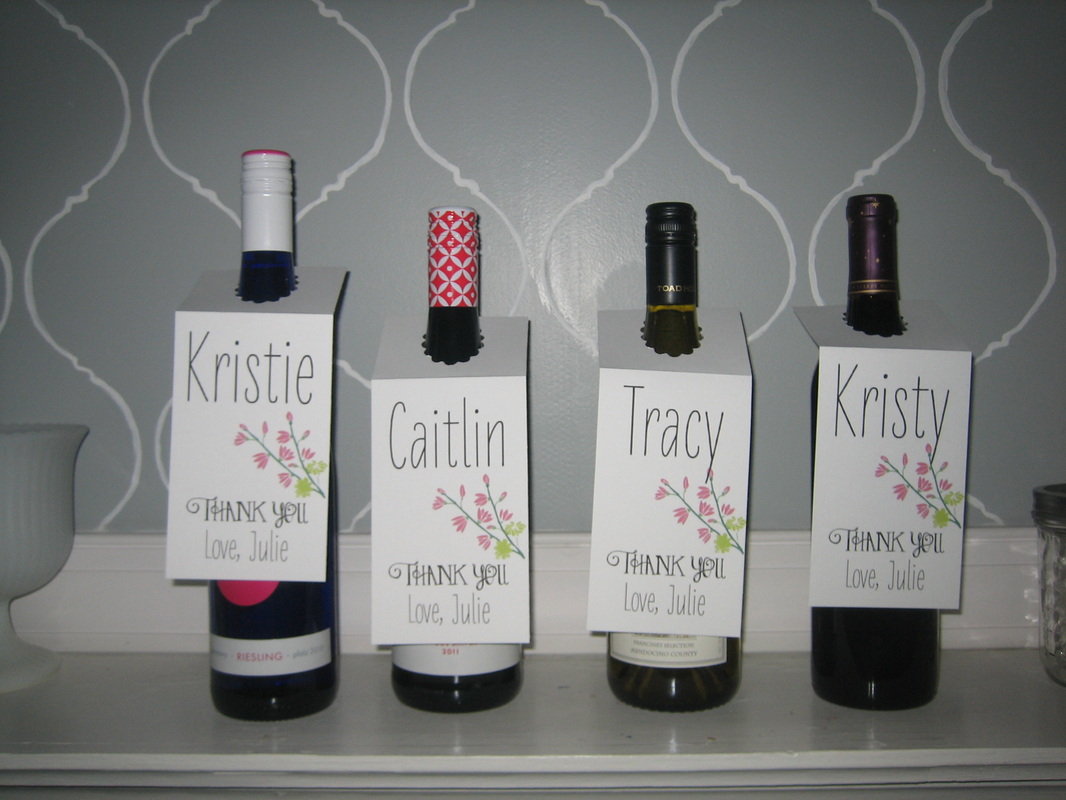
Wine Bottle Tags
This was a quick DIY that I did last minute for my bridesmaids. I got each of them a bottle of wine I think they will enjoy and made 'Thank You' tags to go over the neck of the bottle.